The Enduring Appeal of the Aussie Classic Pavlova: A Guide to Its Crisp Shell & Marshmallow Heart
There are few desserts that command attention quite like the pavlova. With its ethereal appearance, contrasting textures, and vibrant toppings, it's a showstopper perfect for any celebration, from festive holidays to warm summer gatherings. This beloved classic, a culinary icon often debated between Australia and New Zealand, promises a delicate crisp shell yielding to a remarkably soft, marshmallow-like center. Forget any apprehension about mastering this seemingly complex dessert; with the right techniques and a touch of patience, you can create a bakery-worthy pavlova at home that will undoubtedly impress. This comprehensive guide will walk you through every essential step, ensuring your homemade pavlova is nothing short of perfection.
Unraveling the Mystique of Pavlova: Origins and What Makes it Special
The pavlova is more than just a dessert; it's a testament to simple ingredients transformed into something extraordinary. Named in honor of Russian ballerina Anna Pavlova during her 1920s tours of Australasia, its exact birthplace remains a friendly culinary contention between Australia and New Zealand. Regardless of its precise origin, its universal appeal lies in its elegant simplicity and irresistible textural contrast. It’s naturally gluten-free, light, airy, and surprisingly versatile, making it a staple for special occasions like Easter, Christmas, and significant family milestones.
What truly sets a perfect pavlova apart is that coveted juxtaposition: a meringue exterior that shatters delicately with a satisfying crunch, giving way to an irresistibly soft, chewy, and melt-in-your-mouth marshmallow core. This delicate balance, paired with the freshness of whipped cream and seasonal fruits, creates an unforgettable sensory experience. Unlock the Best Pavlova: Easy Recipe for Holiday Wow Factor by following our detailed instructions below.
The Foundation of Flawless Pavlova: Mastering Egg Whites and Sugar Integration
The journey to a sublime pavlova begins with its core ingredients: egg whites and sugar. While seemingly straightforward, precise handling of these components is crucial for achieving that signature crisp shell and soft center. This stage is where many home cooks can either make or break their pavlova, but armed with a few expert tips, you'll set yourself up for success.
Essential Preparations for Peak Meringue Performance
- Room Temperature Egg Whites are Non-Negotiable: Cold eggs are harder to separate, but room temperature egg whites whip to a greater volume and more stable foam. The best practice is to separate your eggs when they are cold (as the yolks are firmer and less likely to break), then allow the whites to sit at room temperature for at least 30 minutes before whisking. This subtle step significantly impacts the final meringue structure.
- Absolutely Spotless Equipment: This cannot be stressed enough. Any trace of grease, fat, or egg yolk in your bowl or on your whisk can prevent the egg whites from whipping up properly. Use a meticulously clean, dry bowl (preferably glass or metal) and whisk attachment. Even a minuscule speck of yolk can contaminate the entire batch.
- The Whisking Progression: From Frothy to Firm: Begin whisking your room temperature egg whites on medium speed. They will first become frothy, then gradually turn opaque and form soft peaks. Continue whisking until they reach firm peaks. A foolproof test? Carefully (and confidently!) invert your bowl. If the egg whites don't budge or slip, they're ready. If they start to slide, keep whisking!
The Art of Sugar Incorporation: Preventing the "Weeping" Pavlova
Once firm peaks are achieved, it's time to introduce the sugar – gradually and thoroughly. This step is vital to prevent the dreaded "weeping" pavlova, where sugar syrup seeps out during baking. Granulated sugar not only sweetens but also stabilizes the meringue, creating that glossy finish and strong structure.
- Slow and Steady Wins the Race: Add the sugar one tablespoon at a time, whisking well after each addition. This allows the sugar crystals ample time to dissolve into the egg white mixture. Impatience here can lead to a grainy, unstable meringue.
- The Finger Test for Dissolution: To ensure the sugar is fully incorporated, take a tiny dab of the meringue mixture between your thumb and forefinger. Rub it gently. If you feel any grittiness or distinct sugar crystals, continue whisking until the mixture is completely smooth and no grains remain. This can take several minutes.
- Final Whisking for Stability: After all the sugar is incorporated and the mixture is smooth, continue whisking for another three minutes. This extra whisking develops a very stiff, glossy meringue that holds its shape beautifully – essential for easy shaping and a stable bake.
Finally, for that signature marshmallow center and added stability, you'll incorporate cornflour (cornstarch), white vinegar, and a touch of vanilla extract. These ingredients are added at the very end. The cornflour helps create the soft, chewy interior, while the vinegar assists in tenderizing the meringue and ensuring a slightly crisp exterior. Whisk these in for *just* 30 seconds – enough to combine, but no more, to maintain the meringue's delicate structure. Mastering Pavlova: Essential Tips for a Delicate Dessert means paying attention to these small but critical details.
Shaping, Baking, and the Art of Patience: Achieving the Ideal Pavlova Texture
With your perfectly prepared meringue, the next steps involve careful shaping and a precisely managed baking process. These stages are just as crucial as the initial whisking for achieving that coveted crisp shell and melt-in-your-mouth center.
Prepping Your Baking Surface and Sculpting Your Pavlova
Before you even think about the oven, prepare your baking tray:
- Parchment Paper is Your Friend: Cut a round piece of baking parchment to fit your baking sheet or pizza stone. To prevent it from sliding, dab a tiny amount of meringue mixture onto four spots underneath the parchment paper to act as an adhesive.
- The Art of Shaping: Spoon all your meringue mixture onto the center of the prepared parchment. Using a spatula, gently shape it into a neat round. Start from the bottom edge and make gentle, upward strokes. The natural movement will cause the top to softly peak and a slight depression to form in the center as it cools – a perfect nest for your toppings later. Avoid over-handling; delicate movements are key. The visible lines from your spatula strokes will add to its rustic charm.
The Baking Crucible: Temperature Control and Unwavering Patience
Baking a pavlova is less about "cooking" and more about slowly drying it out to achieve its unique texture. This requires careful temperature management and, most importantly, patience.
- The Two-Stage Temperature Approach: Preheat your oven to 300°F (150°C). Once you place the pavlova in, immediately reduce the oven temperature to 250°F (120°C). The initial higher heat helps set the exterior quickly, while the lower, longer bake gently dries the meringue, preventing rapid browning and cracking, and allowing the interior to transform into marshmallow.
- The Golden Rule: DO NOT OPEN THE OVEN! This is perhaps the most critical instruction. Opening the oven door, especially during the baking process, can cause a sudden drop in temperature. This thermal shock can lead to the pavlova collapsing or cracking extensively. Trust the process. Resist the urge to peek!
- The Long, Slow Cool Down: Once the baking time is complete (which can range from 1 to 1.5 hours, depending on your oven and pavlova size), turn off the oven but leave the pavlova inside with the door slightly ajar. Allow it to cool completely, undisturbed, within the oven. This slow cooling prevents further cracking and helps set that crisp exterior while preserving the chewy, soft interior. This process can take several hours, even overnight.
The Grand Finale: Customizing Your Pavlova with Exquisite Toppings
Once your pavlova has completely cooled, it’s a blank canvas awaiting its crowning glory. This is where you can truly let your creativity shine, balancing the pavlova's sweetness and texture with complementary flavors.
- Classic Whipped Cream: A generous dollop of freshly whipped cream is the quintessential topping. Use good quality heavy cream, whipped to soft peaks, often lightly sweetened with a touch of vanilla.
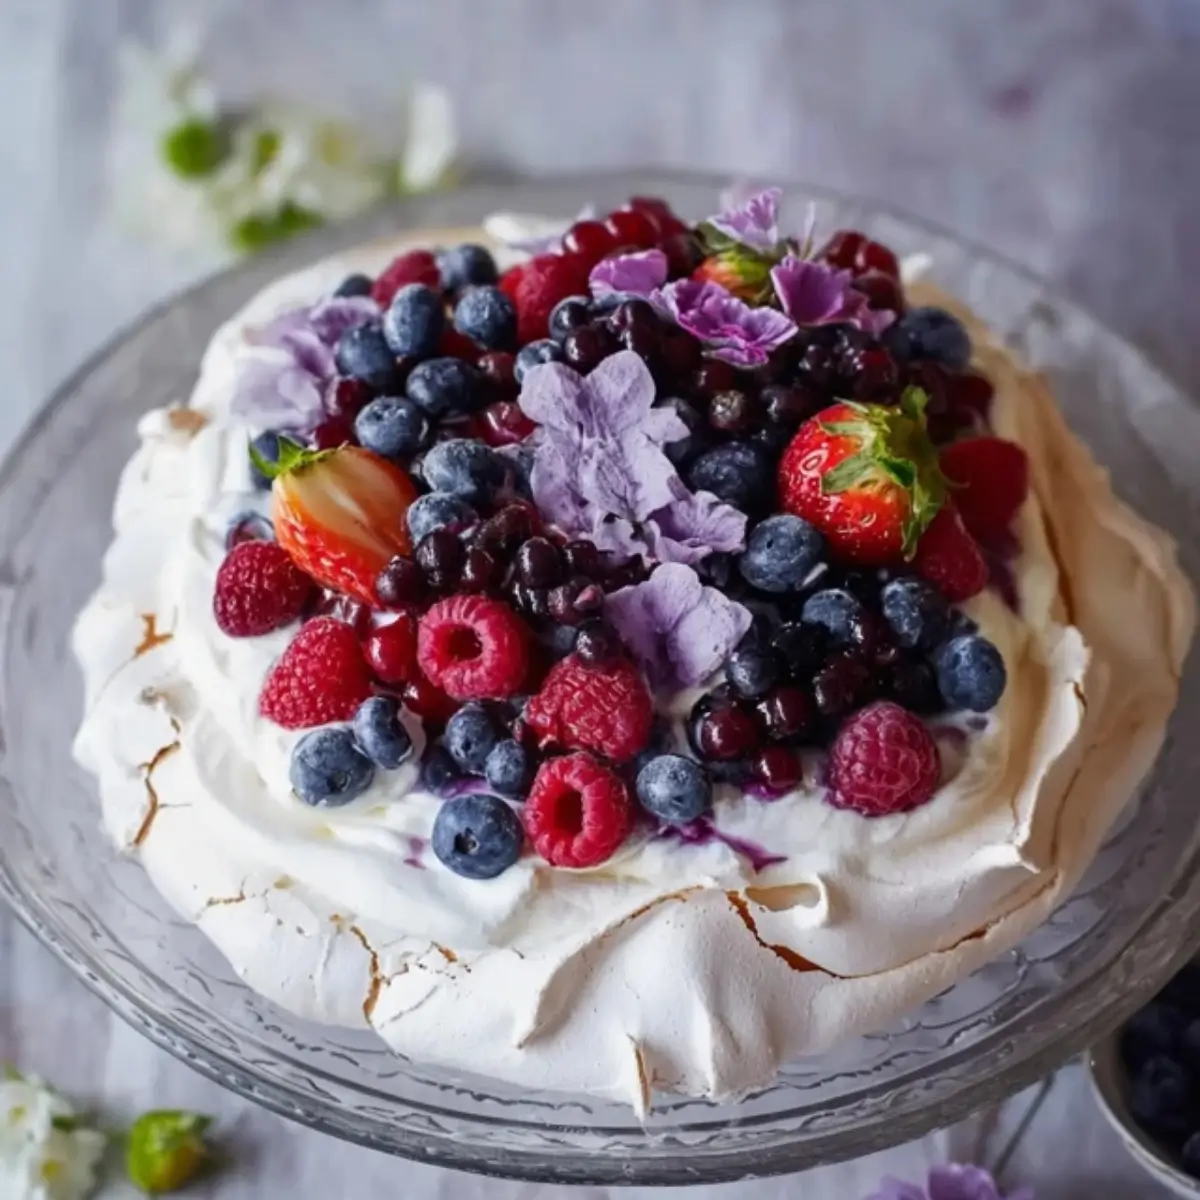
- Vibrant Fresh Berries: Strawberries, raspberries, blueberries, and blackberries are traditional choices, offering a beautiful color contrast and a burst of tart freshness that cuts through the pavlova's sweetness. Arrange them artfully in the center well.
- Tropical Twists: For an exotic flair, consider sliced kiwi, passionfruit pulp, or mango. The tanginess of these fruits pairs wonderfully with the sweet meringue.
- Beyond Fruit: Don't limit yourself! A drizzle of chocolate sauce, a scattering of toasted nuts, a sprinkle of edible flowers, or a spoonful of fruit coulis can elevate your pavlova to new heights. For a truly indulgent experience, try a combination of berries and a light chocolate drizzle.
The beauty of pavlova is its adaptability. While it is sweet, the right combination of toppings ensures a balanced dessert that's never cloyingly so. Aim for a mix of textures and flavors – creamy, crunchy, sweet, and tart – to create an unforgettable culinary masterpiece.
Conclusion: Your Journey to Pavlova Perfection
The Aussie Classic Pavlova is more than just a dessert; it's an experience – a symphony of textures and flavors that captivates and delights. From the meticulous preparation of room-temperature egg whites to the crucial slow bake and patient cooling, each step contributes to its magical transformation. By following these detailed tips and understanding the science behind each stage, you're not just baking; you're crafting an elegant, impressive, and deeply satisfying treat. So, gather your ingredients, embrace the process, and prepare to wow your guests with a homemade pavlova featuring that perfectly crisp shell and an irresistibly soft, marshmallow heart. Happy baking!
